When computers are infected with hard-to-remove viruses, then we need to boot the system from a rescue disk. The best way to remove trojans, viruses and malware is when they are in a weak state. Booting into “safe mode” can be one of the options of removing viruses.
Another way of eliminating viruses is by checking the malware load points for signs of infections. Once your PC is disinfected from malware you need to regain control of your Task Manager, Folder Options menu in Windows and other system changes by resetting them.
Why do you need Kaspersky Rescue Disk ?
Kaspersky Antivirus and Kaspersky Internet Security are anti-virus and internet security products developed by Kaspersky Lab for your computer protection and internet safety. The developer also released another product which can be used for emergency cases of virus removal.
Kaspersky Rescue Disk is another form of virus removal tool that can be burned on a CD/DVD or removable thumb (USB) drive which can be launched anytime when needed. A regular anti-virus program sometimes fails to remove the dreaded viruses and for critical situations like these, Kaspersky Rescue Disk is needed.
[Some affiliate links are provided in this post which will earn me some commission if you buy. No other hidden costs are involved and you will not be charged anything extra if you buy through these links]
Sometimes the viruses/malware start-up when the system boots up. Theses cannot be removed by normal anti-virus programs, though not totally impossible. In such cases, booting from a rescue disk can alienate such un-removable viruses.
Download Kaspersky Rescue Disk 10
How does Kaspersky Rescue Disk Works?
Before we can use any type of CD/DVD/USB drive, it’s best to set the system to boot up from Kaspersky Rescue Disk which can be used to restart the system and fix the virus problems.
Once the rescue disk is inserted, you will be asked to select which objects, like disk boot sector, local hard drive or hidden start up objects, would you like to process with Kaspersky. It will scan all the selected items and deliver a complete report on viruses, trojans, spyware etc. which are detected on the system.
Kaspersky Rescue Disk then facilitates you to quarantine, disinfect or remove all those deep-rooted infections so you can be sure that your system is virus-clean and is running fast and smooth as normal it would be.
What are the Pros of using it?
The additional advantage with Kaspersky Rescue disk is that you can configure settings for your computer’s security level, scanning, optimization and more. You can also set regular updates and notifications. This will automatically detect or modify system errors, obsolete databases and others.
It is highly recommended that you update your anti-virus databases of Kaspersky Rescue Disk 10 (which is the latest version) to get safety-protection for new viruses, spyware and malware.
How to Remove Viruses from your Computer using Kaspersky Rescue Disk?
The first thing in this process, is to download the latest version of Kaspersky Rescue Disk and use any of your favorite CD/DVD/USB burning application to burn the ISO image file to an optical disc or external thumb drive.
How to Use a USB Drive to load Kaspersky Rescue Disk?
- In order to use a USB device, you have to first make sure that the device is FAT or FAT32 formatted.
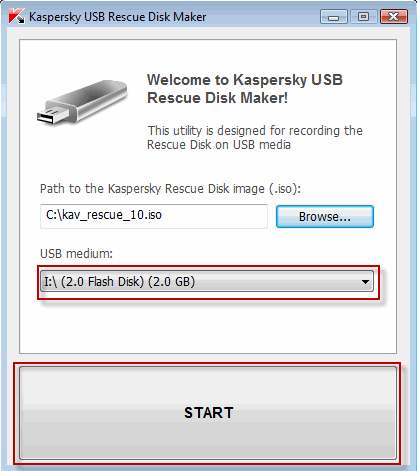
- Download a special utility Kaspersky USB Rescue Disk Maker (rescue2usb.exe).
- On the USB Rescue Disk Maker window, click Browse… and select the iso image of Rescue Disk.
- Select the required USB device from the drop-down menu. and click on the big START button.
- Wait until the process is complete.
How to Clean an Infected Computer?
Insert the USB device containing the rescue disk software and boot from it. You may need to change your BIOS options to make this work.
A message appears asking you to press any key to enter the menu. You need to do this in the next 10 seconds.
A menu appears which has options to choose whether you want a Graphical mode or Textual mode. Generally the Graphic mode is simpler and easy to understand.
What are the further Options?
You then need to accept the End User License Agreeement to move forward. After than it scan your computer for connected devices and searches for file systems of your local and external disks.
Note:
If you are in sleep mode or hibernate mode or if the operation has been completed incorrectly, you will be asked to mount the file system or restart the computer.
In order to boot from hard drive and shut down the operating system correctly, choose the option Restart computer. Other options like Continue, Skip will cause a high risk of file system damage.
Now you can see the full working status of Rescue Disk. The next thing to do is to switch to the My Update Center tab and download the latest anti-virus definitions as already told before.
After updating to the latest file definitions, switch to Objects Scan tab. Select the drives you want to scan, and click the Start Objects Scan button. It will start scanning and clean any viruses it finds.
If the rescue disk scanning finds any virus, you will have the option to clean or quarantine files. There are finer tools included with Kaspersky Rescue Disk, which can be accessed by right-clicking the icon on the task bar, to do further research.
Utilites included are a file manager, fully working web browser, command line (Terminal), screenshot tool and network setup.

[Image Credit : mytechguide.org]
User Reviews on Kaspersky Rescue Disk Functioning – Pros and Cons
These are some users comments on the working nature and troubleshooting performance of Kaspersky Rescue disk. There are some advantages and disadvantages as mentioned from 16 reviews from 2009 to 2013.
- One ransom virus locked the UI and it was important to look into the system or C: drive. The user complaints that the rescue disk couldn’t recognize the C: drive.
- One user tried running from a bootable USB device. He got block-read errors after the boot. But the rescue disk worked flawlessly when booted from a CD-ROM.
- Another user complains the lack of options for different keyboard layouts, as the default option is the US keyboard. Also to use the Windows Unlocker tool, one has to use the Bash terminal. So he requests for a GUI option.
- Another user’s system showed an error – ata2:SRST failed (errno 16). This caused – bootable device not found.
- Sometimes, the cursor movements are too fast using the current drivers. User Profile App Data folder, is the place where the rescue disk files are generally kept, which may cause problems. The root directory, for e.g C:\KAV-RescueDisk, is the right place where these files are to be kept for rectification of this problem.
- For another user, the process of scanning took more than 48 hours.
- There were some issues with USB mice for another user and pointing device on notebooks.
- Another user had a rogue virus that removed Microsoft Security Essentials anti-virus. It held the computer hostage to force him to buy some unfamiliar virus scan software. But Kaspersky Rescue disk was able to scan the system and delete the virus files.
- The rescue disk was able to pick up malware that escaped the Windows Malicious Software Removal tool and MS Security Essentials anti-virus software.

Prompt, where to me to learn more about it?
very good post, i certainly love this website, keep on it
Assalamu aleykum.V uhinbecke Abu Adelya na str.42-43 na vopros `это утюг.Чей он?Он Халида`napisano hazihi Halidin.A na perevod `Это часы Али.Они очень красивые`idet perevod hiya.Tak kak ponyat gde pisat hazihi i gde hiya
Would love to incessantly get updated great blog!
I like this web site so much, saved to favorites .
That’s really thniking at a high level
Some truly select posts on this website, saved to favorites.